Nicks can be frustrating, especially when they appear out of nowhere. It might seem like your favorite blade is damaged forever, but there’s still hope.
Nicked blades can be fixed in many different ways. It takes years of experience and research to find the best method. We did all the experimenting for you and summarized the most important tips. In the sections below, we will try to give you an insight into the process of fixing a nicked knife.
Continue reading to gain an in-depth understanding of the nick removal process Once you’re done reading this guide, you’ll have the expertise to remove the nicks. We will also give you tips on how to protect your knife from nicking.
Nicks On A Knife: What and Why?
If you’ve been around the kitchen, you know that nicks are a normal occurrence. It’s not a matter of knife quality. Almost every knife is bound to get nicked sooner or later.
Why Knives Get Nicked?
Knives get nicked for many different reasons. Here are the most common accidents that might cause a knife to nick:
Exposed edge
The sharpest knives are made up of a hard steel core and an outer layer of softer steel. Hard steels are sharper and more effective for cutting. They’re also very brittle and need to be coated with a layer of soft steel. However, the inner core is exposed around the edge. This is why the knives are usually nicked on the edge. Thin edges are particularly vulnerable to this accident.
Cutting something hard
Sometimes knives get nicked when you press them against the harder material. Let’s take the meat cutting process as an example. If you are slicing meat and notice that your knife’s edge is touching something hard, stop. It’s a bone that you probably didn’t notice. Not all bones are hard enough to nick a blade, but some are. You don’t want to risk nicking your knife by applying too much force.
Knives also get nicked when you’re cutting something out of the freezer. Food that has been in the refrigerator becomes hardened, so cutting it is risky. Lower temperature will make the edge of your knife even more sensitive than normal.
Sometimes your knife can get nicked when you’re cutting fruit with a hard core. Make sure to clear out any seeds or pits from the fruit.
Drop
Knives can also get nicked after getting dropped on the floor. Especially if the knife’s edge hits the floor first. Edges are particularly sensitive parts of a blade.
What Sizes Nicks Are?
Nicks can be up to a few millimeters large in diameter. Usually, forceful contact with a hard material will cause a larger nick. For instance, this is an example of a small nick. You can tell that it is almost unnoticeable:
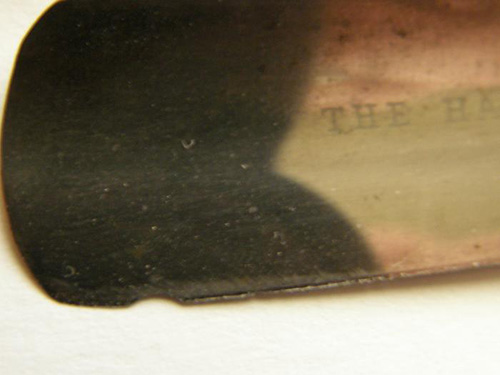
Larger nicks are more noticeable. For instance, look at the picture below:
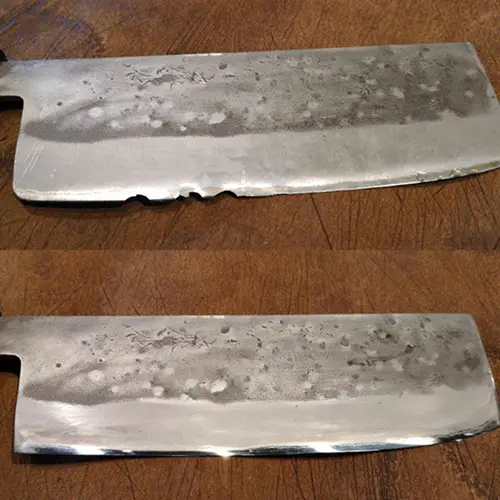
Nicks vs Chips: What’s The Difference?
The terms ‘nick’ and ‘chip’ are synonymous and can be used interchangeably. There’s no official distinction based on size or other factors.
How Nicks Affect Knife Performance
Nick on a knife isn’t noticeable unless it is very large. Unless you use your blade for fine cutting, the performance of the knife won’t be affected.
If you’re a chef or a fine-cutting enthusiast, the difference will be noticeable. The chipped part of the blade is going to leave a mark. Especially if your knife was severely nicked.
Can You Remove Knife Nicks Properly?
You can’t fill the chipped part of the edge. Nor can you piece the broken parts together. Nicks can only be removed if you shave off enough substance to make them disappear.
3 Ways of Sharpen a Nicked Knife to Fix Nicks
Fixing a nicked knife comes down to grinding off the material from the blade. Your knife’s edge must be reduced to the same level as the deepest point of the nick. Some instruments can help you in this process. Below, we’ve compared three tools that can help you fix a nicked blade.
What Kind Of Sharpening Options Are There?
In one way or another, all three instruments are useful. They will help you grind off a portion of the edge. You must level the edge of your knife to make the nick invisible.
Coarse Stones
Sharpening stones with a grit measurement of <1000 are referred to as ‘coarse’. If you’re looking for a tool to grind off a portion of the metal, they are very useful. Coarse stones are the most common solution for fixing nicks. The main reason for these stones’ popularity is their versatility and time-efficiency.
What Kind of Nicks and Knives Coarse Stones Would Fix?
Coarse stones can help you clean up nicks of any size. They’re useful for removing large nicks in a short period of time.
Pros
- Fast grinding
- Versatility
Cons
- Fret
Sanding Belts
Motor-powered belts make it much easier to grind off a portion of your blade. These are practically effortless. The motion of the belts is enough to grind off the metal. As a user, your only job is to choose the proper angle to hold up the knife.
What Kind of Nicks and Knives Sanding Belts Would Fix?
Sanding belts can shave off metal very efficiently. They’re very effective for removing larger nicks. Fixing small and medium nicks is also okay, as long as you’re careful. Don’t shave off more than you have to, or you risk losing more of your knife’s edge.
Pros
- Fast grinding
- Effortless
Cons
- Must be used carefully
A File
Another effective method of fixing a nick is to use a file. The grinding process will probably take longer but the results are worth it.
The main advantage of using a file is that it doesn’t fret. Wear does not affect it, so you can use it as much as you’d like.
What Kind of Nicks and Knives a File Would Fix?
A file can be used to fix nicks of any size. It can be particularly useful for removing small nicks that require careful treatment. However, as a general rule, a file can remove nicks and chips of any size.
Pros
- Doesn’t Fret
- Gives more control
Cons
- Takes more time
1 of 3: Sharpening With Coarse Stones to Remove Nicks
Sharpening stones with a grit of 200, 300, or even 400 are categorized as ‘coarse stones’. If used properly, they are probably the fastest tool to remove nicks from the blade. Coarse stones can be very effective. However, it is important to locate the nicked part of the edge.
Once you start grinding off the edge, you must be careful. You should continue to shed the layers across the blade evenly. As a result, the nick should become invisible. Don’t shave off more than you have to.
Interesting thing is that coarse sharpening stones shed themselves. This is especially noticeable if you do a lot of sharpening or grind off a lot of metal. Keep that in mind when you’re choosing the tools to remove the nicks. If you’re planning to work on a lot of knives, you should consider other options.
Sharpening stones usually come with two sides – one coarse and one fine. If you have a two-sided stone, make sure to figure out which side is coarse. Fine stone is also useful, but for later stages of the process.
Items and Tools You’d Need
- Coarse sharpening stone
- Blade
- Fine sharpening stone
Step 1: Find the nick
Try to slice a paper to locate the nicks on the edge. Once you’ve located it, check the severity of the damage. The size of a nick will determine how much metal you’ll have to grind off. You must shave off enough to make the nick disappear.
Step 2: Shave off the edge
Start grinding the knife. Work on both sides of the nick equally, or you’ll get an inconsistent edge. If you hold the knife at a 90-degree angle, you can grind off the surface much faster.
If you want to sharpen your knife while you’re shaving off the metal, use narrow angles.
Sharpening alone won’t do the trick if you’re working with large nicks.
Step 3: Start Sharpening
Once the nick is invisible, you should stop grinding metal off your blade. The goal is to shave off just enough to make the nick disappear. At this point, your blade has probably lost some of the sharpness.
The good news is that you can use the same stone to restore the sharpness of the blade. Hold the knife to make a narrow-angle with the stone. Start moving it back and forth to sharpen the knife. Switch the sides to make sure they’re equally sharp.
Step 4: Apply the finish
Use the fine side of the sharpening stone to apply the finish. This final conditioning should fix any inconsistencies from the last three steps.
Tips And Precautions
● Grind the steel on all sides equally. Focusing all the effort on the nicked part will result in a ‘low spot’. A certain part of your knife’s edge will be lower. It will be difficult to cut anything with such a knife. The lowered area will be impossible to sharpen as well.
2 of 3: Sharpening With Belts to Remove Nicks
Sanding belts are very effective for removing metal. There are belts with a coarse and fine surface. If you want to remove large or medium nicks from your blade, you’re going to need both.
Coarse belts are better for shaving off the material. Fine grit belts are necessary for the final touch. Both are equally necessary to successfully remove nicks from your blade.
The best thing about belts is that they’re faster than the other mediums. You can fix any blade within minutes. Even if the edge of your knife is severely damaged.
The second-best thing is that the belts require minimal effort. The machine does most of the work for you. All you have to do is choose the alignment for your knife.
If you expose the knife at a very narrow-angle, the edge is going to be thinner. This is okay if you’re going to use a knife professionally. If you’re trying to fix your pocket knife, it’s better to make the edges thicker.
Items and Tools You’d Need
- A sharpener machine like ‘Work Sharp’
- Coarse belt
- Fine grit belt
- Blade to fix
Step 1: Set up the belt
Attach a coarse belt to your machine and adjust the angle. Choose the angle depending on your preferences in regards to the knife’s edge.
Step 2: Grind
Turn on the machine and start shaving off metal using the coarse belt. Make sure to sharpen both sides equally. Switch between the two sides to keep them balanced.
Machine-powered belts are really effective for grinding off excess steel. You must be very careful when working with the coarse belt.
Don’t spend more than few minutes on this step. If you take too long, you might grind off more than you need to.
Step 3: Check for nicks
Sometimes the nicks aren’t detectible by the eye. You need other methods to check if they’re gone. My favorite way is to slice the paper with it. Nicked blades won’t be able to cut through paper smoothly.
If it turns out that the blade is still nicked, go back to step two. Repeat the process until the nick is completely gone.
You can move on to the next step when you can cut through paper smoothly.
Step 4: Apply finish
Once the nick has disappeared, you can apply the final finish. Replace the coarse belt with a fine-grit one. Get the machine started and set it to the same angle. Apply finish for 1-2 minutes and you’re done.
You should be able to notice the difference immediately. Your knife’s surface should look much better.
Tips And Precautions
- Don’t try to find the nick with your fingers, especially if the knife is sharp.
3 of 3: Sharpening With File to Remove Nicks
File has many different qualities that make it useful for many different purposes. It can be used to remove the nicks as well. Before starting the process, the file should be fixed in one place. Otherwise, it will be impossible to apply force when grinding the blade against its surface.
Files aren’t a replacement for sharpening stones. You can only use them to shave off the surface of a metal object.
Once you’re done grinding off the edges with a file, your knife is likely to lose its sharpness. You will need an additional sharpening stone to get it back into shape.
Overall, removing nicks with a file is a time-consuming process. Still, it gives you greater control over the entire process.
Items and Tools You’d Need
- A file
- Two-sided sharpening stone
- A Blade
Step 1: Set up the File
Fix the file in one position. This is an essential part of the process. There are many different ways to secure the file. Usually, people use some kind of strap.
Step 2: Shave off the edges
Start moving the blade across the surface of a file. Hold your knife at a 90-degree angle to have a speedy and efficient process. Continue grinding until you shave off enough metal to make the nick disappear.
Periodically check the condition of the nick. Make sure there are no inconsistencies in your work. Pay equal attention to both sides of the knife.
Step 3: Sharpen the knife
Once the nicks on your knife are gone, it’s time to sharpen your knife. Start with a coarse stone. Hold your knife in a way that makes a narrow angle with the stone. Work out the edges until you’re satisfied with the sharpness.
The angle between the stone and knife will determine the thickness of the edge. If you want to be safe, go for thicker edges. When holding your knife, make a 45 or 60-degree angle against the stone.
Step 4: Apply the finish
Once you’re satisfied with the sharpness of your blade, it’s time to apply a mirror finish. Use fine grit stones to do so. This will give your knife a finished glossy look.
Tips And Precautions
- Knives with thin edges are the sharpest, but they also break easily. Go for thick edges unless you’re sure you can take care of the blade.
Does Nicks Fade Away from Knives Over Time?
Nicks will only go away if your knife sheds some of its edges. This won’t happen if you continue to use it casually.
As we’ve previously mentioned, coarse stones are effective for removing the nicks.
The primary purpose of coarse stones is to sharpen a knife. Over a long period of time, your knife will likely need to be sharpened numerous times. Eventually, you’ll remove enough material off the edge to make the nick disappear.
It can take years for a knife to go through this cycle. Smaller chips naturally disappear more easily. Larger chips only go away after very intensive sharpening over a long period of time.
Not all people are in a hurry to remove the nicks. If you’re okay with slightly nicked knives, you can continue to use them. Just make sure to sharpen the knife whenever it becomes blunt. This will ensure that the nick goes away by itself.
If you want to remove the nicks, use any of these methods to remove them. Also, if your knife has large chips, they won’t disappear on their own. You’ll have to take the initiative to remove them.
Tips To Avoid Having Nicks on Knives?
Nicks happen when the edge is forced against a material that can’t be cut. It happens when you try to cut hard substances like frozen food, bones, or even seeds in a fruit. Here are the steps you can take to protect your knife:
- Check the temperature: Steel becomes more brittle when it is cold. Make sure your knife hasn’t been in a refrigerator or outside the house. Cutting frozen food will also affect the temperature of the knife.
- Avoid common accidents: Usually knives get nicked as a result of an accident. Be more careful when handling the knife. Especially if you’re using harder Japanese knives.
- Make edges thicker: Knives with thin edges are very sharp. Sometimes it’s better to sacrifice sharpness for safety. Making the edges of your knives a little thicker will make them more resistant to nicks.
- Knife storage: Keep your knives separate from other utensils. Occasional contact with other metals can easily nick particularly fragile knives.
You can prevent nicks by following these simple tips. Still, you can’t always prevent a nick. When it happens, follow our advice on how to fix the knife.
Frequently Asked Questions
Anyone who’s been around the kitchen knows about the nicks. Some people want to find more specific answers to their questions. Let’s look at the most common questions:
What angle to sharpen knife for removing nicks?
Sharpening your knives at a 90-degree angle will effectively remove nicks on the edge.
What grit to sharpen knife for nick removal?
Any sharpening stone with a grit of under 1000 will be fine. Nick removal will go faster if you use stones with a lower grit.
Does honing steel sharpen knife?
Honing steel is not an alternative for sharpening stone, but it’s useful in many ways. It will realign the edge and improve the knife’s cutting quality.
Does leather sharpen knife?
You can’t sharpen a knife using leather alone. It can only refine and polish the surface of the blade.
how do you sharpen a serrated knife?
Each serration needs to be sharpened one at a time. Sharpening rods are the best solution for sharpening serrated knives.
Closing Words
Nicks can happen to everyone. Taking care of your knife goes a long way, but no one’s completely safe. When nicks do occur, stay calm and use the tips from this guide.
The knife won’t be as good as new, but it will be close. Our advice will help you restore flawless edges on your knife.
- How Long Does Vegan Butter Last? Mystery Solved - January 9, 2024
- How Long Does Vegan Mayo Last - January 2, 2024
- From Pot to Plate: How Long Does Vegan Chili Last in The Fridge? - December 26, 2023








 How To Patina A Knife With Vinegar